Florian Schroiff has been building for the web for almost 20 years. He has worked on countless accessible websites as a freelancer and for various agencies. As a front-end expert he is always searching for ways to improve accessibility and user experience and to share them with his team — and now with you!
HTML, or HyperText Markup Language, accessibility is an important part of web development. It ensures that all users, including those using screen readers or other assistive technologies, can interact with your content effectively.
In this article, we’ll walk you through practical steps and actionable strategies to enhance your website’s HTML accessibility and make a real difference!
Understanding semantic HTML
Semantic HTML, also known as semantic markup, involves using HTML5 elements to describe the meaning and structure of web content rather than just its appearance. Unlike traditional HTML, where the page structure is defined by generic tags like <div> and <span>, semantic HTML uses tags to describe the purpose of the content, not only how it looks.
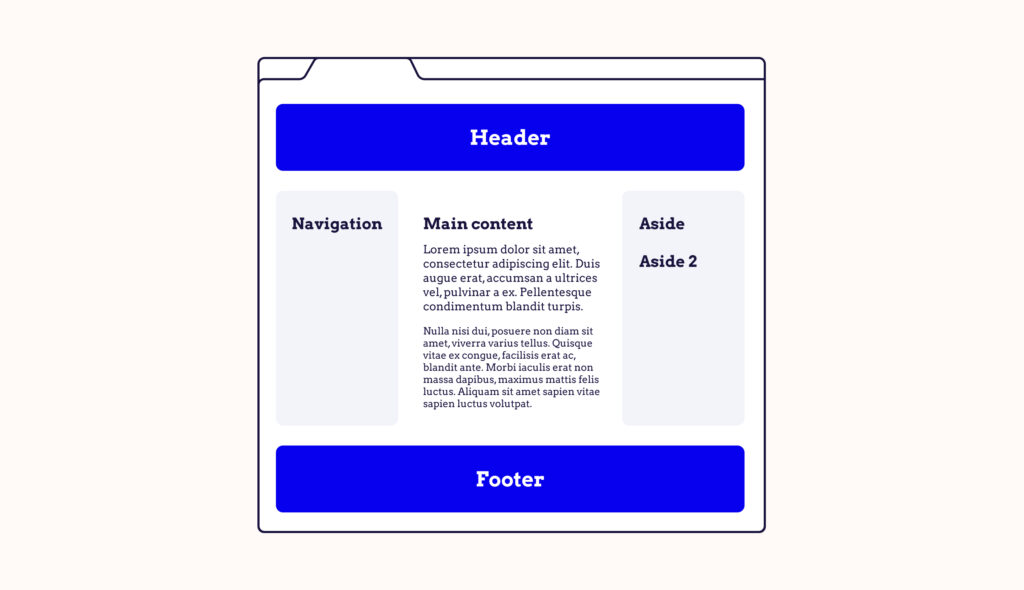
With semantic HTML, we get HTML landmarks, which are used to identify and define the primary areas of a web page, making it easier for users, especially those using assistive technologies like screen readers, to navigate and understand the content structure.
Here are some examples of semantic HTML5 elements and landmarks:
- The
<header>tag represents introductory content or a set of navigational links. - The
<footer>tag describes a footer for a document or section. - The
<article>tag defines independent, self-contained content. - The
<nav>tag means a page section that links to other pages or parts within the page. - The
<main>tag specifies the main content of a document. It’s the primary focus of the document and should be unique to that page, not repeated across different pages. - The
<aside>tag indicates content related to but separate from the main content, such as sidebars, advertising, or supplementary information. - The
<section>tag represents a standalone section of content within a document. It should be used for thematic grouping of content, often accompanied by a heading.
If you’re using multiple of the same type of landmark, the best practice is to give your landmarks a name to make it easier for screenreader users to navigate to the specific landmark they are looking for. To do this, a visible label should be provided, referenced using the aria-labelledby attribute. If necessary, a brief, descriptive label can be provided with aria-label.
The use of semantic HTML and landmarks makes web pages more comprehensible and navigable for users and more easily interpreted by search engines – here’s why:
- Enhanced accessibility: Screen readers and other assistive technologies rely heavily on the semantics of a webpage. Proper use of tags can significantly improve the experience for users with disabilities, providing them with context and structure.
- Search Engine Optimization (SEO): Search engines like Google prioritise websites with a clear, semantic structure. Semantic HTML helps them understand the content better, leading to potentially higher rankings in search results.
- Maintenance and collaboration: A well-structured semantic HTML code is easier to read and maintain. It also makes collaboration among developers more efficient as the code is self-explanatory to a great extent.
- Cross-browser, device compatibility, and future-proofing: Semantic HTML promotes better compatibility across different browsers and devices. As web technologies evolve, a semantically structured page will likely remain consistently functional and attractive across platforms and understandable by future technologies.
- Interoperability: Semantic HTML helps in creating web pages that can be easily parsed by various devices and tools, enhancing the overall interoperability of web content.
- Reduced need for extra markup: Using semantic tags reduces the need for additional divs and spans, leading to a cleaner, more streamlined codebase. This can result in faster load times and better performance.
- Global web standards compliance: Semantic HTML is part of the W3C’s standards. Adhering to these standards helps in creating globally compatible and compliant web content.
By ensuring that you use semantic HTML wherever possible, you are not only aligning with accessibility standards but also providing the best possible experience for all your website users.
Best practices for HTML accessibility
Creating an accessible website means ensuring that everyone, regardless of their abilities, can enjoy your content. Keep the following best practices and examples in mind to help you craft a more inclusive web experience.
We recommend you start with the “Web accessibility, the basics” course by The A11y Collective to get a comprehensive grounding in web accessibility. For those looking for more specific guidance on writing accessible HTML, the “Accessible code” course is a great place to start for anybody with basic HTML experience.
Include the HTML lang attribute
A small yet significant aspect of web accessibility is correctly using the lang attribute in your HTML. It communicates the language of your webpage to various tools and technologies, including browsers, search engines, translation software, and, importantly, screen readers.
The lang attribute should be declared within the <html> tag. This sets the default language for the entire webpage. Here’s how it looks in practice:
<!DOCTYPE html>
<html lang="en">
<head>
  <!-- Head elements -->
</head>
<body>
  <!-- Page content -->
</body>
</html>
Here, lang="en" indicates that the primary language of the webpage is English. It’s a simple declaration, but it has far-reaching implications for accessibility.
Screen reading software uses this attribute to switch to the appropriate language settings, ensuring the text is pronounced correctly. It also aids in search engine optimisation by helping search engines understand the language of the content.
There might be instances where your webpage contains content in multiple languages. Here, you can use the lang attribute within any HTML tag to indicate a change in language for a specific portion of the page. This is particularly useful for screen readers, as it alerts them to switch their pronunciation rules to match the specified language.
<p>The following phrase is in French: <span lang="fr">Bonjour, comment ça va?</span></p>In this snippet, the primary language of the page is still English, but the <span> tag indicates that the phrase “Bonjour, comment ça va?” is in French with the lang="fr" attribute. This helps screen reading software to pronounce this phrase correctly, enhancing the user experience for those relying on such technology.
Use headings properly
When designing a webpage, it’s important to structure your content with proper headers for readability and accessibility. Heading tags in HTML are more than just a means to enlarge text; they serve as signposts, guiding users through your content, particularly for those using assistive technologies.
For individuals relying on screen readers, headings are the roadmap of your content. They allow users to quickly understand the layout and main points of a page, identifying sections that are relevant to them without having to navigate through every word.
Headings also allow for easier navigation for screen reader users. They can skip between sections using keyboard shortcuts, making the journey through your webpage more efficient and less cumbersome.
To create a clear and logical structure, use different types of heading tags hierarchically. Here’s how to approach it:
- Single
<h1>tag: Each page should start with a single<h1>tag. This is typically the title of your page and should clearly describe the overall content. - Logical hierarchy with
<h2>,<h3>, etc.: Subsequent headings should follow in a logical, descending order. Use<h2>tags for main section titles and<h3>for subsections within those. Continue with<h4>,<h5>, and<h6>as needed for further subdivisions.
This is an example illustrating this structure:
<h1>Guide to Gardening</h1>
  <h2>Planting Basics</h2>
    <h3>Choosing the Right Soil</h3>
    <h3>Essential Gardening Tools</h3>
  <h2>Advanced Techniques</h2>
    <h3>Hydroponic Gardening</h3>
    <h3>Organic Pest Control</h3>
Avoid using heading tags simply to make text big or bold for aesthetic reasons. This practice can confuse screen reader users and disrupt the logical flow of your content. Headings should always be relevant and descriptive of the content that follows them.
Make sure that the headings are directly related to the text underneath them. This clarity is vital for screen reader users, who often use headings to navigate and identify sections of interest. A well-structured page with clear headings enhances the user experience, making your content accessible and easy to navigate for everyone.
Employ descriptive link text
Descriptive link text improves both the navigation and accessibility of a webpage. It’s about creating hyperlinks and guiding users effectively through your site.
Link text should clearly indicate what information the reader will receive upon clicking. Vague link text like “Click here” or “Read more” lacks context and forces users, especially those using screen readers, to search for additional information to understand the link’s purpose.
They also aid users in making informed decisions about whether to follow a link or not – particularly helpful for screen reader users who often navigate by jumping from link to link.
A bad example would be “Click here to learn about gardening”. The “Click here” part does not convey information about the link’s destination. On the other hand, a good example would be “Learn more about gardening techniques”. This clearly describes what the user can expect to find.
To guarantee that you’re on the right path, use semantic <a> elements with an href attribute: Always employ an <a> element with an href attribute for links. This ensures that the link is keyboard-accessible and functions correctly across all devices.
<a href="https://www.example.com">Visit our homepage</a>Make links visually distinct for sighted users. The traditional approach uses a colour contrast (often blue) and an underline. This visual distinction helps users quickly identify links within the content.
If a link opens in a new tab, indicate this in the link text or with an adjacent icon. For example, “Read our blog (opens in a new tab)”. And if a link downloads a file, specify this in the link text, along with the file type and size, like “Download Gardening Guide (PDF, 2MB)”.
<a href="https://www.example.com/blog" target="_blank">Read our blog (opens in a new tab)</a>
<a href="guide.pdf" download="GardeningGuide.pdf">Download Gardening Guide (PDF, 2MB)</a>
Write effective alternative (alt) text
Alternative (alt) text is a fundamental aspect of HTML accessibility. It serves as a textual substitute for non-text content, like images, on your website. This text provides critical context for site visitors using screen readers or for those who cannot view images due to various reasons, such as slow internet connections or visual impairments.
Alt text allows screen reader users to understand the content and function of images on your site. It’s an essential tool for conveying the message that an image is meant to communicate. Also, search engines use alt text to understand the context and relevance of images. Well-written alt text can improve your content’s visibility and ranking in search engine results.
Adding alt text in HTML is straightforward. You simply include the alt attribute within the <img> tag like so:
<img src="flowers.jpg" alt="A colourful garden full of blooming flowers">Here are some tips for writing descriptive alt text:
- Be specific and descriptive: Ensure your alt text accurately describes what is shown in the image. If the image conveys important information, the alt text should communicate the same message.
- Relevance is key: The alt text should enhance the user’s understanding of the page and not be out of context.
- Conciseness matters: Aim to keep alt text under 125 characters. Screen readers often cut off alt text beyond this point, so concise, to-the-point descriptions are best.
- Avoid redundant phrasing: Do not start alt text with phrases like “image of” or “photo of,” as screen readers typically announce the image element before reading the alt text.
- Steer clear of keyword stuffing: While it’s important for SEO, avoid overloading your alt text with keywords. It should read naturally and be user-centric.
- Handling decorative images: If an image is purely decorative or its content is described in nearby text, it’s often best to leave the alt attribute empty (
alt=""). This approach informs screen readers to skip the image.
Every element of your website, including images and effective alt text, helps ensure that your website’s visual content is accessible to all users, regardless of how they access it.
The role of ARIA in HTML accessibility
Accessible Rich Internet Applications (ARIA), being part of the Web Accessibility Initiative (WAI) of the World Wide Web Consortium (W3C), is a set of attributes that enhance the accessibility of web content for people with disabilities.
ARIA works with HTML, providing additional context and information to assistive technologies, like screen readers. This is particularly vital for dynamic content and advanced user interface controls developed with Ajax, HTML, JavaScript, and related technologies. It makes websites easily navigable, bridging accessibility gaps that cannot be managed with HTML alone.
But how exactly does ARIA do that?
Defining interactive elements:
ARIA roles specify the function of elements on a webpage. For example, roles can define an element as a button, a navigation menu, a dialogue box, or a checkbox. These roles help screen reader users understand the purpose of different elements, particularly when their function is not visually obvious.
<div role="navigation">...</div>
<div role="checkbox" aria-checked="false">...</div>
Working with assistive technologies:
By defining the roles of various elements, ARIA aids assistive technologies in interpreting and interacting with complex web components. This is especially important for custom-made interactive elements that go beyond the scope of standard HTML.
Pro tip: While ARIA is powerful, it’s important to remember that many of its roles and attributes overlap with existing HTML tags. In cases where HTML has a native element that serves your purpose, it’s best to use that. For example, instead of using div with an ARIA role of “button”, use the HTML <button> tag.
ARIA is complex and should be used cautiously. Incorrect use of ARIA can lead to more harm than good in terms of accessibility. Therefore, it’s essential to have a thorough understanding before implementing it.
For those interested in delving deeper into ARIA and its applications, The A11y Collective offers an insightful course titled “ARIA explained”. This course can give you the knowledge and skills to use ARIA effectively, ensuring your website is accessible to the widest possible audience.
Remember, the goal of ARIA and accessibility in general is to create a web environment that is usable and inclusive for all, regardless of their abilities or how they access the web. ARIA, when used correctly, is a powerful tool in achieving this goal.
Take your next steps toward accessible design
Incorporating HTML accessibility into your website design is a commitment to inclusivity, ensuring that everyone, regardless of their abilities, can access and benefit from your content. This journey toward accessible design is one that enhances user experience, increases site usability, uplifts your brand’s reputation, and guarantees compliance with essential web standards.
From semantic HTML and the use of descriptive link text to the implementation of alt text and the role of ARIA, each element plays a necessary role in making the web more navigable and understandable for all users, including those using assistive technologies.
However, it’s important to remember that the journey doesn’t end here. The world of web accessibility is ever-evolving, and continuous learning is key to keeping up with best practices and standards. While the guidelines provided in this guide are a solid starting point, they only scratch the surface of what it means to create truly accessible web content.
With a range of dedicated courses on web accessibility, The A11y Collective offers resources for anyone looking to deepen their understanding and skills in this field. Whether you’re a beginner or an experienced developer, these courses are designed to guide you through every aspect of accessible web design.
Every step you take toward accessibility is a step towards a web that welcomes everyone. Start your learning journey today with The A11y Collective and make a lasting impact on the way the world experiences the web!